Hey guys,
So here is the next DIY for our new house. This particular item will actually be going in my room and I recently discussed in my room inspiration post that it was going to be houndstooth. Well, unfortunately we were unable to find the exact houndstooth fabric online that we used for the chair that my mom and I recovered and I didn't have enough left over to make it look good. We also couldn't find any houndstooth fabric in any of our local craft/fabric stores so we decided to go with a fabric that coordinated with the cream color in the houndstooth fabric. I am very happy with the way that it turned out and I have fortunately have enough houndstooth fabric left over to make a pillow or two to place on the bench!
Here is what the chest looked like before. I had already taken off the original handles that came with it because my mom and I have been talking about redoing it for years but never got around to it. The color is original but the blue and red plaid fabric on the bench is not. You will see later on how many times the bench has been covered.
So I kind of forgot to take pictures in between but a lot of has happened in this pictures. We sanded the stain off of the front of the chest and I believe by this point both sides has been done as well. We also went ahead and took off the bottom wood piece a.k.a the legs. I wanted to try and make this chest look as modern as possible which is why we decided to go ahead and remove the bottom legs.
I also forgot to take pictures between all of the steps. But at this point we had finished sanding all of the cracks and hard to reach places. We then added one coat of this stain, let it dry for a few hours, and then we went back with a second coat, and let it dry for a few hours. I then decided to add the handles and screw the lock back on which I had removed during the sanding process because it kept getting scratched by the sander.
This is what the chest looked like completely stained with the lid down and the handles. The picture above as the lid open which allows you to see what the cedar looks like.
We then brought the chest inside to finish working on it.
We purchased the legs from Lowe's (I am not that happy with them so I may change them out if I ever find legs that I really like.) This is a picture the legs and the pieces you have to screw into the bottom of the piece of furniture in order for the legs to attach to the furniture. This is what the legs looked like after being stained with one coat.
This is a picture of the chest with all four legs screwed in and attached to the bottom.
Here is what the chest looked like standing on the legs without the bench attached to the top. One thing you can notice is that the handles are very crooked. I do plan on switching them out with crystal knobs that I plan to purchase from Hobby Lobby. I'm hoping the knobs will not look as crooked as the handles do. However, I purchased the handles from Lowe's.
Now on to the bench portion…
Here is what the bench looked like underneath the first layer of fabric.
And here is the original piece of fabric that came with the chest. This chest is very old and is actually probably as old as I am so the fabric is very dated.
After I removed all of the fabric, I also removed the piece of foam that was original to the chest as well. We purchased new foam from Joann's and batting as well. The piece of foam we purchased was 2 inches thick and the batting we purchased was large enough to cover a queen size bed. We weren't really sure what type of batting to get or how large to get. So we just grabbed one that we thought would be large enough and one that sounded good haha.
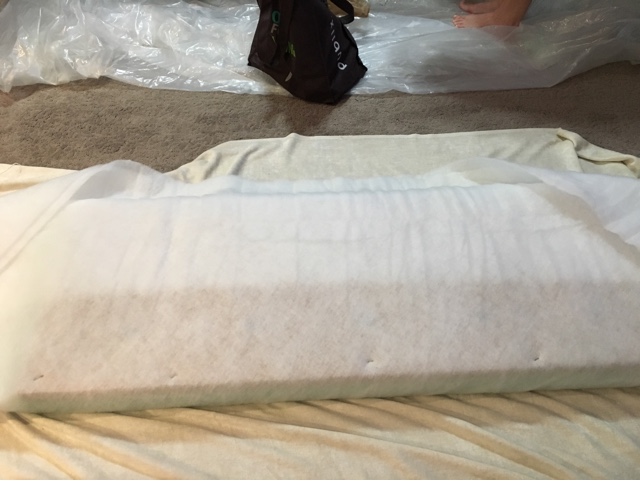
Here is what the different layers looked like. The bottom layer is the particle board that was original to the chest, the next layer is the 2 inch foam, the third later is the batting which I doubled over, and the last layer is the fabric that we purchased which you will see in the next image.
Here is what the bench looked like after I had finished tufting it. This is the YouTube tutorial I watched to learn how to tuft and I highly recommend following all of her steps because it was definitely helpful. My only complaint about tufting is that it is very time consuming. In theory, it wasn't a hard process but it was extremely hard to find the hole that we drilled to bring the needle back through.
After I finished tufting, I stapled all of the batting to the particle board. Then I went around and cut off all of the excess. Next, I moved onto the fabric and stapled all of it down and then removed the excess.
This is what the bench looked like once everything had been stapled down and all of the extra fabric had been removed.
The next three pictures are the final product from different angles. After we finished stapling and cutting the excess fabric, all we had left to do was the screw the bench back onto the rest of the chest.
And my dog totally approves, so that great news!
Thanks for stopping by!
Feel free to leave a comment or share this with your friends!
XO, Steph


Wow. This looks great! I have to repair an old cedar chest. Any tips on how to take the original "legs" off? Hopefully, I can do as good a job as you did.
ReplyDelete2FF4FBF7E8
ReplyDeleteTakipçi Satın Al
Footer Link Satın Al
Telegram Coin Botları
Stumble Guys Elmas Kodu
Brawl Stars Elmas Kodu
A76E4CBDEC
ReplyDeleteTakipçi Satın Al
En İyi Bilim Kurgu Filmleri
En İyi Filmler
42FBB13B2A
ReplyDeleteTakipçi Satın Al
Cami Avizeleri
SEO Uzmanı